how to screenshot on Chromebook- Taking screenshots has become an essential skill for most people. Screenshots can be handy if you’re trying to capture a memorable moment, document necessary information, or troubleshoot technical issues. You may wonder how to take a screenshot if you’re using a Chromebook.
This article will discuss the ins and outs of taking screenshots on a Chromebook, including different methods and tips to help you become a screenshot master. So, whether you’re a student, a professional, or a casual user, read on to learn how to take a Chromebook screenshot like a pro!
Chromebook’s Screenshot Shortcuts:
Chromebook is a laptop on Chrome OS, a Linux-based operating system designed by Google. If you own a Chromebook, taking screenshots is a common task you need to perform. Chromebook offers several screenshot shortcuts that allow you to capture images of your screen quickly and easily.
Here are the different ways how to screenshot on Chromebook:
Full-Screen Screenshot.
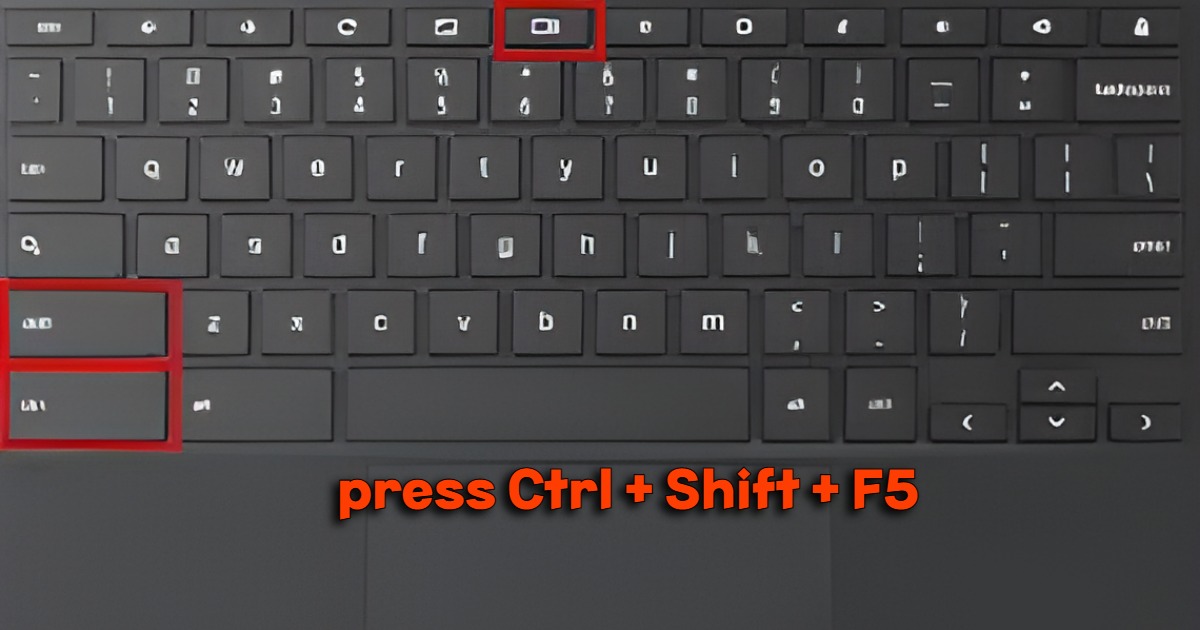
To take a full-screen screenshot on a Chromebook, press the Ctrl + Show Windows keys. The Show Windows key is located in the top row of your keyboard and usually has a square with two lines next to it. After pressing the keys, your Chromebook will capture an image of your entire screen and save it to your Downloads folder.
Partial-Screen Screenshot.
If you only want to capture a portion of your screen, you can take a partial-screen screenshot. To do this, press Ctrl + Shift + Show Windows keys. The cursor will turn into a crosshair, and you can click and drag to select the area you want to capture. Once you release the mouse button, your Chromebook will save the image to your Downloads folder.
Tablet Mode Screenshot.
Taking a screenshot is different if you use your Chromebook in tablet mode. You will need to press the Power + Volume down buttons simultaneously. The screen will flash, and the image will be saved to your Downloads folder.
Taking a Full-Screen Screenshot:
Chromebooks are popular devices that many people use for various purposes. One of the essential features of any device is the ability to take screenshots. Screenshots can capture critical information, share content with others, or troubleshoot problems. This article will discuss how to take a full-screen screenshot on a Chromebook.
Use Keyboard Shortcuts.
Keyboard shortcuts are the easiest and most convenient way to take a full-screen screenshot on a Chromebook. To take a full-screen screenshot, follow the steps below:
- Press the “Ctrl” and “Show Windows” keys (the Show Windows key is usually located in the top row of the keyboard and looks like a rectangle with two lines on the right side).
- The screenshot will be saved to your Chromebook’s Downloads folder.
Use the Power and Volume Down Buttons.
If you prefer physical buttons instead of keyboard shortcuts, you can take a full-screen screenshot on a Chromebook using the Power and Volume Down buttons. Follow the steps below:
- Press and hold down the Power button and the Volume Down button simultaneously.
- Release the buttons when you hear a camera shutter sound or see a notification that a screenshot has been taken.
- The screenshot will be saved to your Chromebook’s Downloads folder.
Use the Chrome Browser Extension.
Another way to take a full-screen screenshot on a Chromebook is using a Chrome browser extension. There are several extensions available in the Chrome Web Store that can help you capture screenshots. One of the most popular ones is called “Lightshot.” To use this extension, follow the steps below:
- Go to the Chrome Web Store and search for the “Lightshot” extension.
- Install the extension and open it.
- Click on the “Capture” button and select “Fullscreen.”
- The screenshot will be saved to your Chromebook’s Downloads folder.
How to Capture Part of the Screen:
Capturing a part of the screen is a valuable skill to have for a variety of reasons. Whether you need to take a screenshot of a specific webpage section or capture an image to use in a presentation or document, knowing how to capture a specific screen part can save you time and make your work more efficient. Fortunately, there are several easy-to-use methods for capturing part of the screen, regardless of whether you are using a PC, Mac, or mobile device.
Here’s how you can master the art of capturing part of the screen on your Chromebook:
Use the Keyboard Shortcut.
To capture a part of the screen on your Chromebook, press the Ctrl + Shift + Show Windows keys simultaneously. The “Show windows” key is the one that looks like a rectangle with two lines on the right-hand side.
Select the Area to Capture.
After pressing the keyboard shortcut, your cursor will change to a crosshair. Click and drag your cursor to select the area of the screen you want to capture. You can capture anything from a small portion of the screen to the entire screen.
Save the Screenshot.
Once you’ve selected the area you want to capture, release the mouse button. Your screenshot will be automatically saved in the Downloads folder. You can also view and edit the screenshot by clicking on the notification in your screen’s bottom-right corner.
Saving and Sharing Your Chromebook Screenshots:
Chromebooks have a built-in screenshot tool that makes it easy to capture and share images of your screen. Saving and sharing a screenshot on a Chromebook is a straightforward process that can be completed in just a few steps.
Take a Screenshot.
To take a screenshot on a Chromebook, press the Ctrl + Show Windows keys simultaneously. The Show Windows key is located in the top row of the keyboard and looks like a rectangle with two lines on the right side. The screenshot will be saved to your Chromebook’s Downloads folder.
Open the Screenshot.
To open the screenshot, click the status area in the bottom-right corner of the screen, then click the file icon to open the Files app. From there, navigate to the Downloads folder and find the screenshot you just took.
Share the Screenshot.
To share the screenshot, right-click the file and select Share. This will create a dialog box where you can choose how you want to share the screenshot. You can share it via email, Google Drive, or any other sharing method available on your Chromebook.
Save the Screenshot to Google Drive.
If you want to save the screenshot to Google Drive, you can select the screenshot file in the Files app, then click the More actions button (three vertical dots), and select Move to. From there, choose Google Drive as the destination folder.
Edit the Screenshot.
If you want to edit the screenshot before sharing it, you can use the built-in image editor in the Files app. Simply right-click the screenshot file and select Open with > Image editor. From there, you can crop, resize, and annotate the image as needed.
Conclusion:
In conclusion, taking a screenshot on a Chromebook is a simple process that can be easily mastered with the proper knowledge and tools. Following the steps outlined in this guide, you can capture and save screenshots of your Chromebook screen, window, or selected area and share them with others as needed. Keyboard shortcuts and Chrome extensions can make the process even faster and more convenient. With these tips and tricks, you can become a screenshot master and take full advantage of your Chromebook’s capabilities.
Visit for More Best Articles


